
In the meantime it would be a waste if we spent so much time trying to get the sails perfect, but neglected to teach our clients how to get the most out of their sails. Moth Sailors spend hours sanding and fairing their hydrofoils, but sometimes do not spend the time fairing their aerofoil (IE their sail). Typically walking around with a batten tensioner for a few minutes is the norm.
Here is how to try to get the most out of your North H-13 mainsail with a few simple steps.
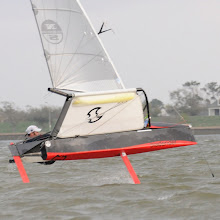
Below is an image onboard of a North H-13 mainsail downwind. You can see the entry angle is quite even from the top to bottom. If your sail matches your mast, then you should have no problem achieving a similar look. Too be critical, I probably should have added one spacer to the bottom batten.

For those sailors familiar with developing or trimming sails for skiffs or yachts you can probably understand the look of a sail with too much or too little luff curve. If a mainsail has creases running to the middle of the mast from the clew, you know you could use a little more luff curve in that area of the sail and/or less mast bend. A moth sail is no different, but we do have a different tool set.
The easiest change is to add or take out cam spacers which essentially is fine tuning the luff curve of the sail to match the mast. When I get a new sail I'll do a "pinch" test at each cam to get enough spacers so that you cannot pinch more than 1-2mm of cloth in front of the mast. If you can pinch more, then the leeward side of your luff sleeve may have wrinkles.
After pinch testing each cam, I rig the sail on the boat and go full controls on. I look for an even entry angle on all the battens like the image below (traced from the photo above):

Perfect setup
However, sometimes you will have too much entry angle in one batten. This causes wrinkles to project from the front of the battens above and below to the middle of the batten that needs less spacers. See image below:
One too many spacers
One too few spacers

1 comment:
Hello there. Awesome blog. I started sailing a waszp in november. Now that my boat handling is getting alright I thought I should turn my attention a little higher up, to the main sail. My foiler is not a moth and the sail is not NS but still I found your comments on setting up the sail (cam spacers and sail entry mostly) and the adjusting on the controls from another post, very valuable!!. I love the "if you see that on the sail, adjust that control", very simple observation, very simple adjustment. Congrats Chris. Too bad you haven't posted anything for a while. Thanks a ton!. Santi
Post a Comment